Last Updated: 16 June 2025
How to convert Kato Class 800 First Class Driving Car (DPTF) to DCC Sound
This guide shows how to install DCC sound into the first class driving end car (designation 'DPTF') of the Kato N Gauge Class 800 models, including:
- Class 800/0 800021 in GWR Green (5-car set) (10-1671)
- Class 800/0 800010 'Michael Bond' in GWR Green with Paddington Bear branding (5-car set) (10-1673)
- Class 800/2 800209 in LNER white/red (5-car set) (10-1674)
- Class 800/1 800113 in LNER white/red (9-car set) (10-1675)
This guide shows how to install sound in the first class driving end (DPTF) car, and includes modification of the red and white directional marker lights. Some modification of the chassis, underframe and interior is required. The body shell does not need any modification. This guide will fit a Next18 socket in the kitchen area, which cannot be seen as the windows are plated over. The speaker is hidden under the floor.
The standard formation of the five-car LNER and GWR Class 800s is: DPTS-MS-MS-MC-DPTF. You can also fit sound to the standard class driving car, and also the motorized centre car. It is recommended that as a minimum, you install sound in the centre car where one decoder controls both the sound and the motor. For maxiumum effect, convert the motorized centre car and both end cars, particularly if you have the 9-car LNER set.
This guide assumes you have already purchased an ESU LokSound 5 Micro DCC Sound decoder with a Class 800 sound file (e.g. Legomanbiffo) loaded onto it.
Step 1 - Remove Body
First remove the body by gently unclipping it and pushing upwards. Remove the lighting diffuser.
.jpg)
Step 2 - Modify Interior Components
Remove the seating detail by unclipping it, followed by the lighting unit and the weight. Turn the seating unit upside down, and remove the support pillar furthest away from the kitchen end. This will create space for the speaker to fit under the floor.
Remove the kitchen area detail as shown to create a flat base for the decoder socket to sit. As with the prototype unit, the windows are blanked out so none of this will be visible when the model is reassembled.
Drill two holes for the wires to pass up through later.
.jpg)
.jpg)
.jpg)
Step 3 - Modify Track Pickups
Using a Sharpie, mark the copper strips at the non-driving end just after the plastic pillar where the first of the large body clips is.
Remove the two spring clips that normally hold the slot-in function decoder in place, then remove both copper strips. Cut where marked at the non-driving end. At the driving end, cut just before the first 'bump' where the spring clips were removed. Discard the two middle pieces.
Add a small blob of solder to the ends of each of the four remaining copper strips - this will make it easier to solder wires later on.
Put a small amount of glue on the plastic pillars at the non-driving end, and refit the now shortened copper strips. At the driving end, put a small blob of glue just after the body clips and refit the two copper strips at that end too.
.jpg)
Step 4 - Fit Speaker
Using glue or blacktack, fit the speaker into the underfloor tray. Take care to line up the speaker terminals with the underside of the seat mouldings, so everything can sit flush when refitted.
Solder two brown wires to the speaker terminals.
Step 5 - Rewire Track Pickups
Join up the two bogie pickup strips on each side of the chassis using a red and black wire respectively. Solder a further red and black wire to each side, which will be run inside the body to our new decoder socket.
.jpg)
.jpg)
Step 6 - Modify Lighting PCB
A common cause for complaint on the Kato Class 800 models, is issues with one or both directional lights not working. The reason for this, is the spring clips we removed earlier rely on a good contact being made to the Kato function decoder, which sometimes is not the case. Tramfabriek has a great guide on how to solve problems with the Kato light decoders. The modifications in this guide also make this problem go away.
Solder a blue wire to link the two common positive pads. Then solder another blue wire that will go to the decoder socket. Solder a white wire for the white LED, and a yellow one for the red LED.
Refit the lighting PCB in the chassis, making sure it locates correctly and nothing can touch the two copper strips.
.jpg)
.jpg)
.jpg)
.jpg)
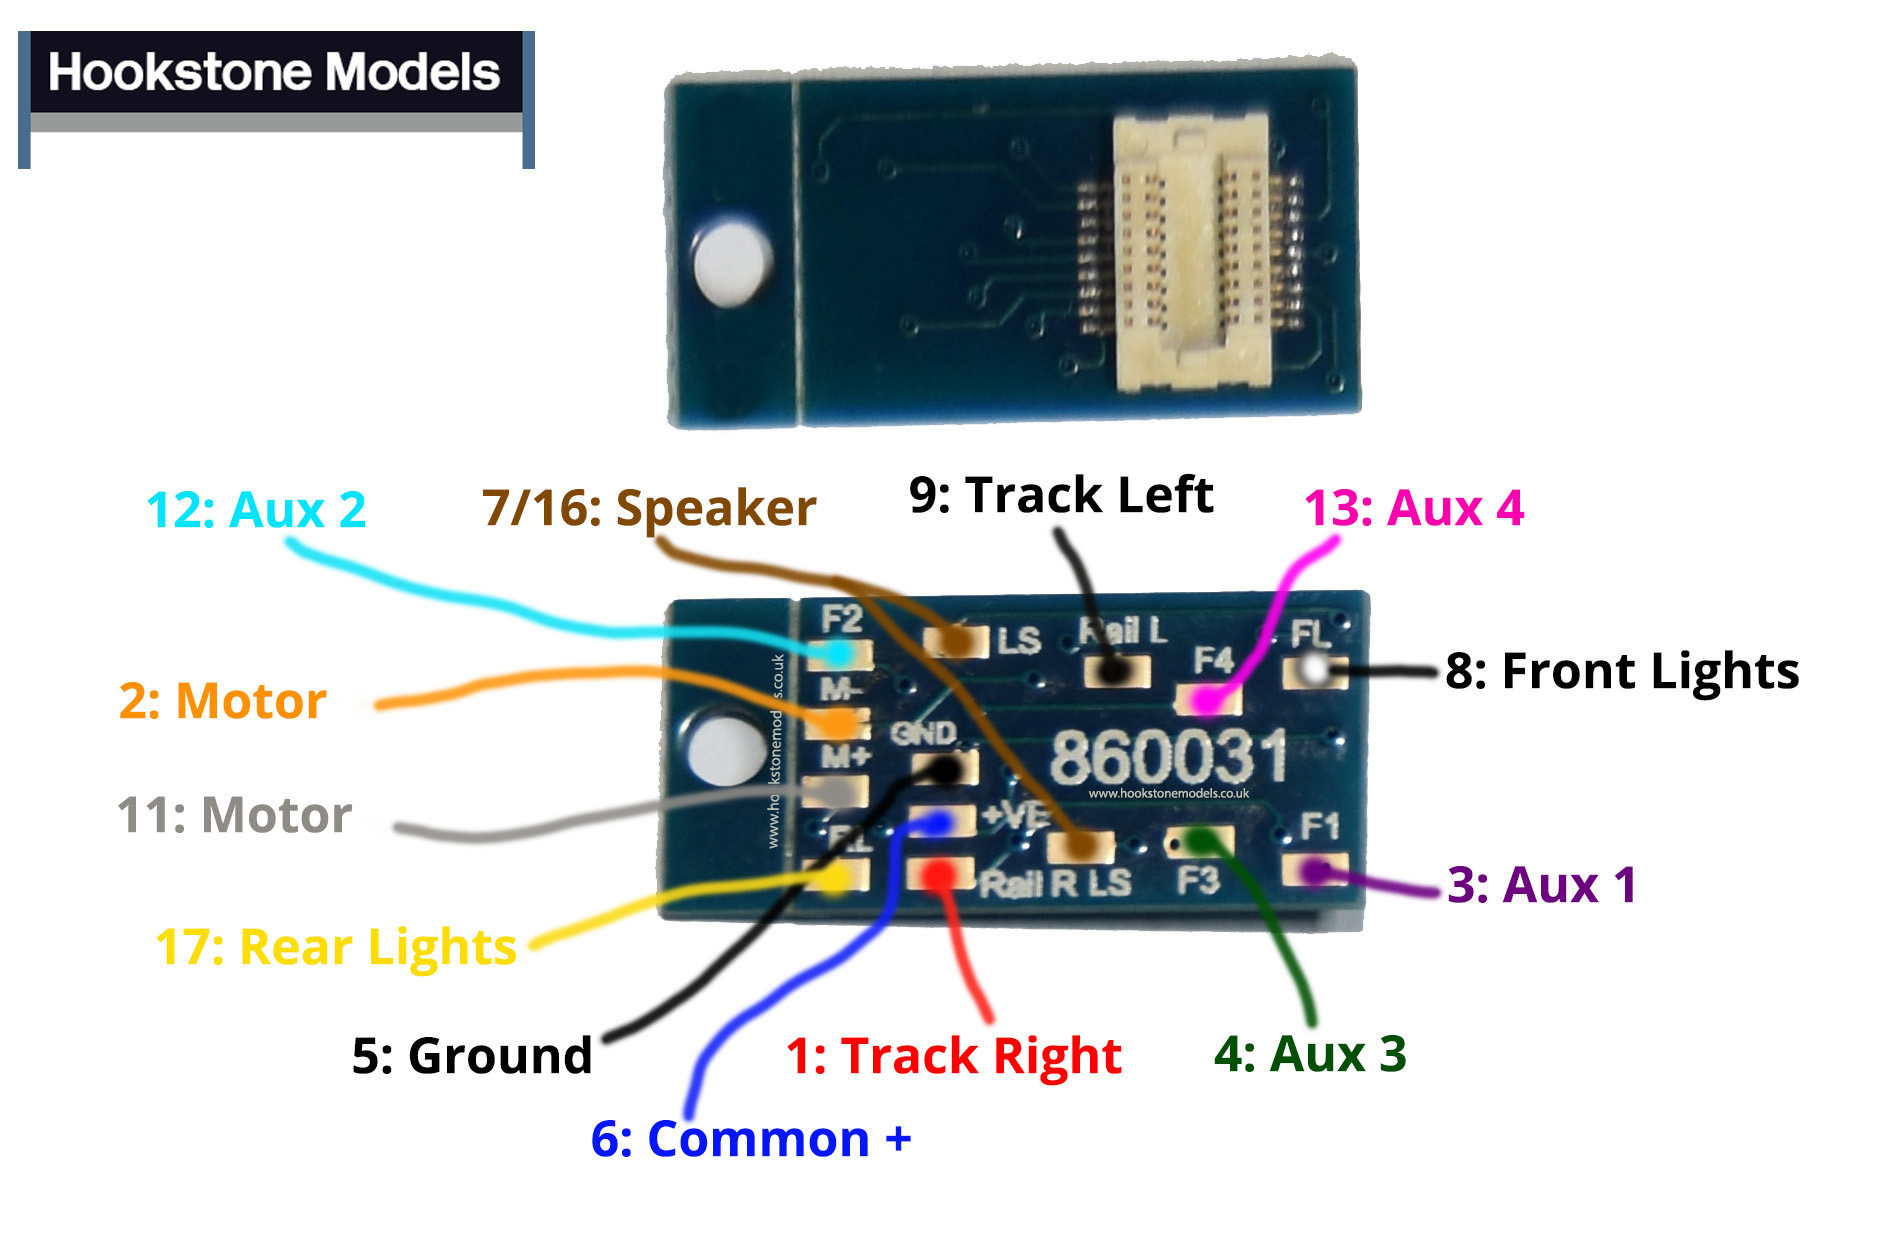
Step 7 - Fit Decoder Socket
Pass the wires up through the two holes, then clip the seating section back onto the chassis.
Solder the wires onto the decoder socket using the diagram below.
Glue the socket in place.
.jpg)
.jpg)
.jpg)
Step 8 - Fit Decoder
After checking your wiring for shorts, fit your sound decoder into the socket. Place onto your test track and confirm you can read the loco ID back.
If all is well, test the directional lighting works as expected, followed by the sound functions.
.jpg)
.jpg)
Step 9 - Refit Body
Refit the light diffuser, clip the body back on, and the conversion is complete.
.jpg)
Other guides you may be interested in..
.jpg)
.jpg)
.jpg)
.jpg)
.jpg)